The most important aspects of applying vinyl:
In addition to the directions below, here are some videos that demonstrate good vinyl installation. The first video shows installing a visor graphic on a Stilo ST5 helmet. The second video shows the installation of a PCA Club Racing decal about 12" wide and 4" tall. The third video shows the installation of a 944 hatch banner - which is the same technique as any windshield banner.
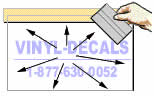
- Make sure the surface is clean and smooth
- Use soapy water to reduce wrinkles and air bubbles - primarily applies to larger decals
- Be patient peeling off the pre-mask - it may take a while for the vinyl to reach full adhesion (especially when soapy water is used)
In addition to the directions below, here are some videos that demonstrate good vinyl installation. The first video shows installing a visor graphic on a Stilo ST5 helmet. The second video shows the installation of a PCA Club Racing decal about 12" wide and 4" tall. The third video shows the installation of a 944 hatch banner - which is the same technique as any windshield banner.

|
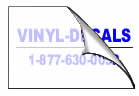
Installation of small to medium size decals
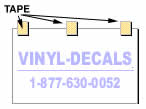
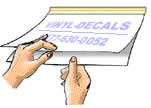
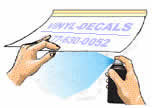
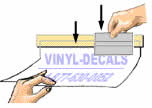
1. Measure where you want you decal to be. Then tape in place on 1 side only to use as a hinge, using regular masking tape. Place your tape on the top, bottom or either side, however you feel more comfortable. Feel free to trim around the decal with scissors until the size matches the area of application. You can also write on the top of the PRE-MASK (top layer) to measure the centerline or make alignment marks. 2. Peel the bottom WAXY LINER layer away from the DECAL and MASK LAYER starting at the opposite side of the masking taped hinge, and slowly remove it. 3. Wet method is suggested for beginners and larger decals. To use the wet method placement, spray the smooth surface with a mixture of soap and water. Wet Application Fluid: Wet method is how you install larger images with NO BUBBLES in it (and a MUST for frosted vinyl to ASSURE every bubble is removed) , being wet allows you to squeegee out the air bubbles trapped inside before it sticks to the surface. You can make your own application fluid with 4 drops of dishwashing liquid (dawn, joy, or baby shampoo etc.) to 1 quart of water in a spray bottle. 4. While still holding the PRE-MASK layer away from the smooth surface. Use a squeegee, credit card or any plastic straight edge to help in application. Start from the side with the tape and gently work away from the tape and squeegee out all water and soap. (Note: if you do not have a squeegee use your fingertips or the sharp edge of a credit card, plastic ruler or similar object) 5. Use your squeegee and apply pressure from the middle to the outward sides, this will remove all water and start the decal adhesion. Let sit for 5 minutes before removing. If your decal appears to not be sticking the fluid is still behind the decal, just squeegee again and let sit for 10-15 minutes. The decals have a pressure sensitive adhesive the harder you rub the harder it sticks, also the longer you let it sit the stronger the adhesive will adhere. 6. Now you’re ready to pull off your PRE-MASK layer and view your decal. Gently pull it off, if you see some vinyl start to come up with the PRE-MASK then lay it back down, squeegee, and wait a few minutes and try again. (Sometimes it may take an hour or more.) Prick any air bubbles with a pin and rub down. Be sure that outer edges of decal are rubbed down smoothly and all liquid is forced out. This is essential for proper adhesion. Wet method The wet method is recommended on decals larger than 12" x 18" in size, and frosted vinyl. 1. Be sure that the surface is clean and free from residue. Find center of decal and the surface on which you want to apply it. Hold the decal in place desired and mark two top corners with pencil. 2. Put 2 to 3 drops of Ivory Liquid per gallon of water and sponge onto adhesive surface only. DO NOT wet backing sheet. (Glass Plus or other non-ammonia window cleaner may also be used). 3. Start separating the decal at one corner and pull it back slowly, keeping the adhesive wet as you go. 4. Wet the surface with the same solution mixed previously and position the decal to the marks established in No. 1. Wet hands with solution and rub over decal lightly, smoothing out any wrinkles. 5. Work out water with plastic squeegee and dry excess liquid with a soft cloth or paper towel. Squeegee the decal from top to bottom beginning at the center. Proceed right from center, and left from center overlapping strokes 50%. Prick any air bubbles with a pin and rub down. Be sure that outer edges of decal are rubbed down smoothly and all liquid is forced out. This is essential for proper adhesion. 6. Decal must dry out for 24 hours before adhesion is complete. |
